Author email |
|
Last update |
january 2024 |
Difficulty |
Easy |
5.1.2. Basics of Git and GitHub
We introduce Git and GitHub in Pymodaq documentation because we believe that every experimental physicist should know about those wonderful tools that have been made by developers. They will help us code and share our code efficiently, not only within the framework of Pymodaq or even Python. Moreover, since Pymodaq is an open source project, its development is based on those tools. They have to be mastered if we want to contribute to the project or develop our own extension. Even as a simple user, we will learn where to ask for help when we are in difficulty, because Pymodaq’s community is organized around those tools.
5.1.2.1. Why Git?
Git answers mainly two important questions:
5.1.2.1.1. How do I organize my code development efficiently? (local use)
It allows you to come back to every version of your code.
It forces you to document every step of the development of your code.
You can try any modification of your code safely.
It is an indispensable tool if you work on a bigger project than a few scripts.
5.1.2.1.2. How do I work with my colleagues on the same code? (remote use)
Git tackles the general problem of several people working on the same project: it can be scientists working on a paper , some members of a parliament working on a law, some developers working on a program…
It is a powerful tool that allows multiple developers to work on the same project without conflicting each other.
It allows everyone that download an open-source project to have the complete history of its development.
Coupled with a cloud-based version control service like GitHub, it allows to easily share your project with everyone, and have contributors, like PyMoDAQ!
5.1.2.1.3. How does it do that?
A program is nothing more than a set of files placed in the right subfolders.
Git is a version control software: it follows the development of a program (i.e. its different versions) by keeping track of every modifications of files in a folder.
5.1.2.2. Installation & configuration for Windows
5.1.2.2.1. Installation

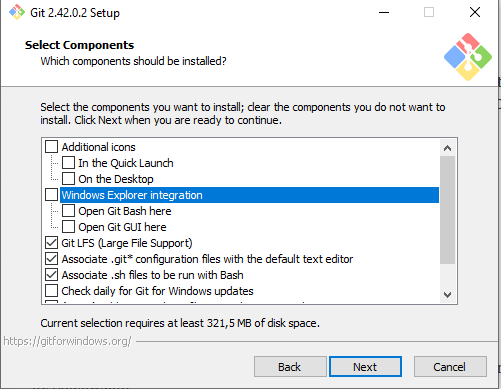
Fig. 5.1 Download the installer from the official website.
Download the installer from the official website. Run the installer. From all the windows that will appear, let the default option, except for the following ones.
Uncheck “Windows Explorer integration”.
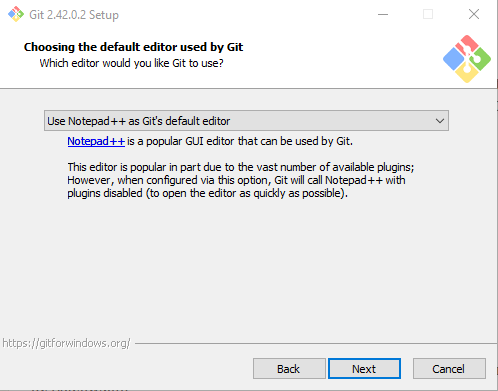
For the default editor, do not let Vim if you don’t know about it, for example you can choose Notepad++.
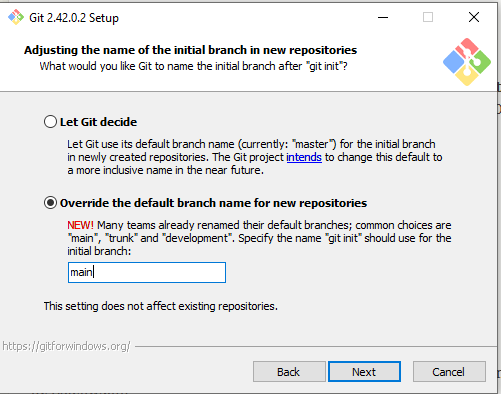
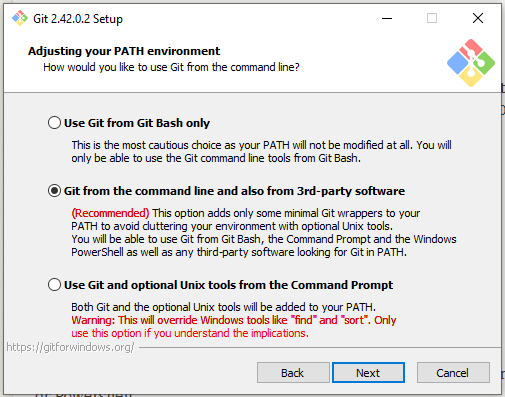
Use the following option for the name of the default branch.
If you develop from Windows, it is better that you let Git manage the line endings.
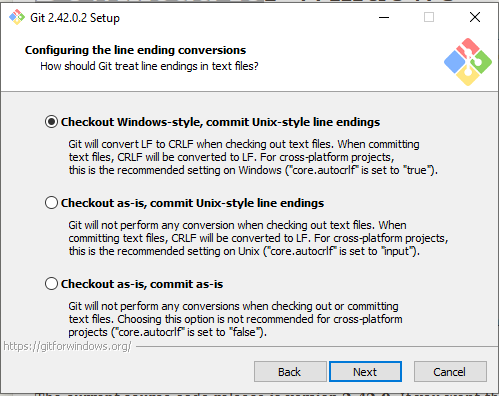
Use the second option here.
Open the Git Bash terminal (Windows Applications > Git > Git Bash or Search for “Git Bash”) that has been installed with the Git installer.
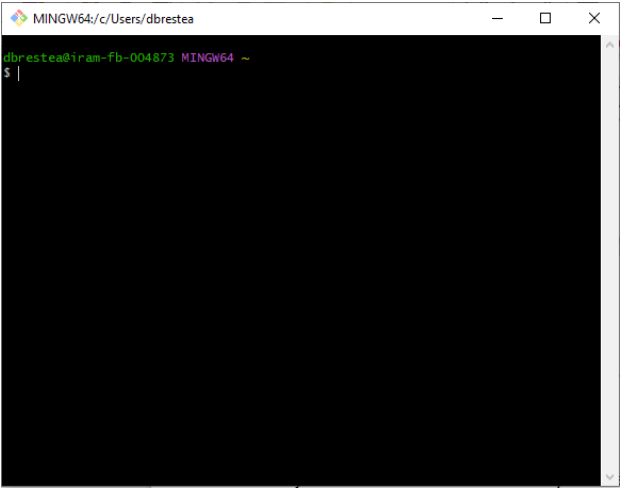
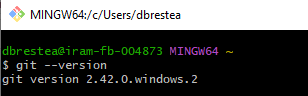
We can now check that it is actually installed on our system.
5.1.2.2.2. Configuration
Just after the installation, you should configure Git so that he knows your email and name. This configuration is global in the sense that it does not depend on the project (the repository) you are working on. Use the following commands replacing with your own email and a name of your choice:
$ git config --global user.email "david.bresteau@cea.fr"
$ git config --global user.name "David Bresteau"
Good, we are now ready to use Git!
5.1.2.3. Installation & configuration for Ubuntu
5.1.2.3.1. Installation
In a terminal
$ sudo apt install git
5.1.2.3.2. Configuration
Just after the installation, you should configure Git so that he knows your email and name. This configuration is global in the sense that it does not depend on the project (the repository) you are working on. Use the following commands replacing with your own email and a name of your choice:
$ git config --global user.email "david.bresteau@cea.fr"
$ git config --global user.name "David Bresteau"
Good, we are now ready to use Git!
5.1.2.4. Local use of Git
We will start by using Git just on our local machine.
5.1.2.4.1. Before we start…
What kind of files I CAN track with Git?
Opened file formats that use text language: any “normal” language like C++, Python, Latex, markdown…
What kind of files I CANNOT track with Git?
Closed file format like Word, pdf, Labview…
Images, drawings…
5.1.2.4.2. The init command: start a new project
We start a project by creating a folder in our home directory, with the mkdir Bash command (for “make directory”)
Note
The home directory corresponds to the directory that is reserved to the connected user. On Windows, it corresponds to the path C:\Users\<username>. Here the user is called dbrestea, you should replace it by your own username. When we open Git Bash, or any terminal in general, we are placed at our home directory in the file system, it can be represented by the ~ symbol (in orange in the above screenshots).
$ mkdir MyLocalRepository
And cd (for “change directory”) into this folder
$ cd MyLocalRepository
It should look like this now:

Now, we tell Git to track this folder with the init Git command
$ git init
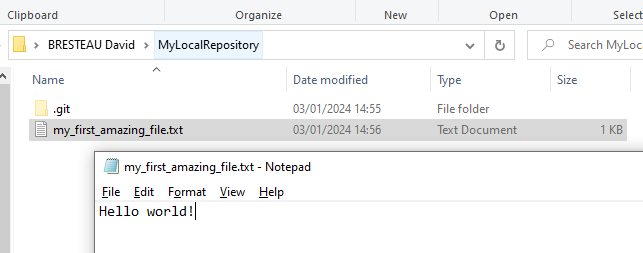
Any folder that is tracked by Git contains a .git subfolder and called a repository.
We now create a new my_first_amazing_file.txt file in this folder and write Hello world! inside
5.1.2.4.3. The status command
You should never hesitate to run this command, it gives you the current status of the project.
$ git status
It should look like this:
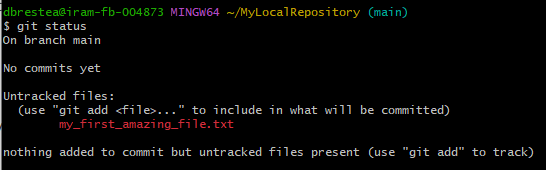
Here Git says that he noticed that we created a new file, but he placed it under the Untracked files and colored it in red.
The red means that Git does not know what to do with this file, he is waiting for an order from us.
We have to tell him explicitly to track this file. To do so, we will just follow what he advised us, and use the add command.
5.1.2.4.4. The add command
To put a file under the supervision of Git (to track the file), we use the add command. This has to be done only the first time we add a file into the folder.
$ git add my_first_amazing_file.txt
Then we do again the status command to see what have changed.
It should look like this:
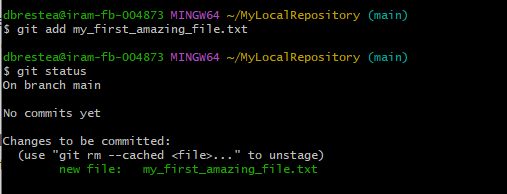
Now the filename turned green, which means that the file is tracked by Git and ready to be commited.
5.1.2.4.5. The commit command
A commit is a fundamental notion of Git.
A commit is a snapshot of the folder status at a point in time.
It is our responsability to decide when to do a commit.
A commit should be done at every little change we do on our program, after we tested that the result is as we expected. For example, we should do a commit each time we add a new functionality to our program that is working properly.
For now, we just have one sentence in the file: “Hello world!”, but that’s a start. Let us do our initial commit with the following command
$ git commit -am "Initial commit of my amazing project. Add my first amazing file and say Hello world!"
It should look like this:

After the -am options (which means that we add the files (here we add the file in the commit and not in the tracking system of Git), and we type the message of our commit just after the command), we put a message to describe what we have done between parenthesis.
If we now look at the status of our project

Everything is clean. We just did our first commit! :)
5.1.2.4.6. The log command
The log command will give us the complete history of the commits since the beginning of the project.
$ git log
It should look like this:

We can see that for each commit we have:
An id that has been attributed to the commit, which is the big number in orange.
The name and email address of the author.
The date and time of the commit.
The message that the author has written.
In the following we will use the –oneline option to get the useful information in a more compact way.
$ git log --oneline
It should look like this:

5.1.2.4.7. The diff command
The diff command is here to tell us what have changed since our last commit.
Let us now put some interesting content in our file. We will found this in the textart.me website. Let’s choose an animal and copy paste it into our file. (Textart is the art of drawing something with some keyboard characters. It would be equivalent to just add a sentence in the file).
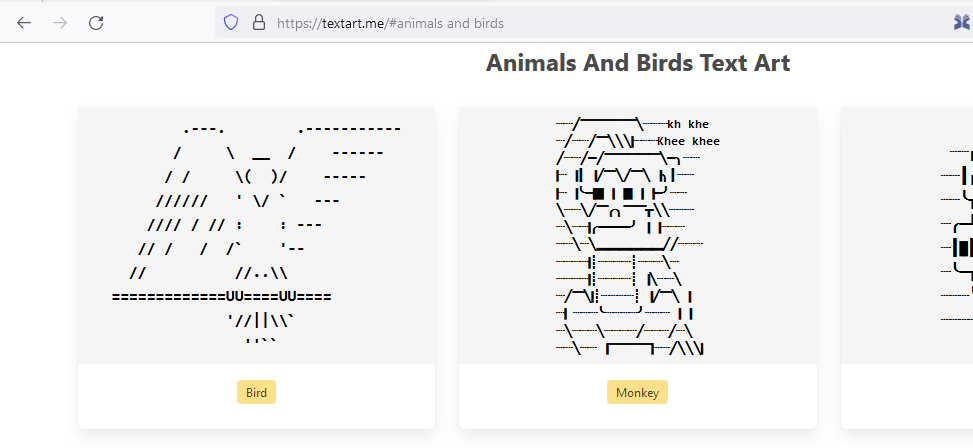
Let’s go for the monkey, he is fun!
Let’s not forget to save the file.
What happen if we ask for a difference from Git, with the diff command?
$ git diff
It should look like this:
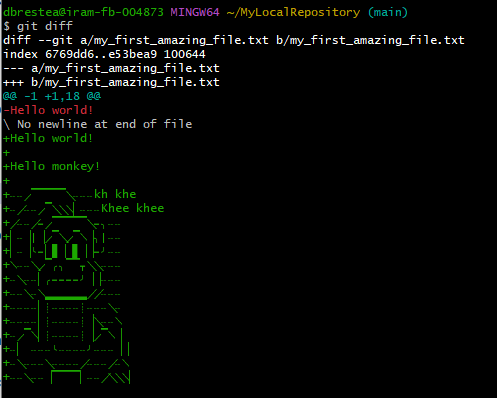
In green appears what we have added, in red appears what we have removed.
The diff command allows us to check what we have modified. Since we are happy with our last modification, we will commit our changes.
$ git commit -am "The funny monkey has been added."
Let us check what the log says now.

We now have two commits in our history.
5.1.2.4.8. The revert command
The revert command is here if we want to come back to a previous state of our folder.
Let’s say that we are not happy with the monkey anymore. We would like to come back to the original state of the file just before we added the monkey. Since we did the things properly, by commiting at every important point, this is a child play.
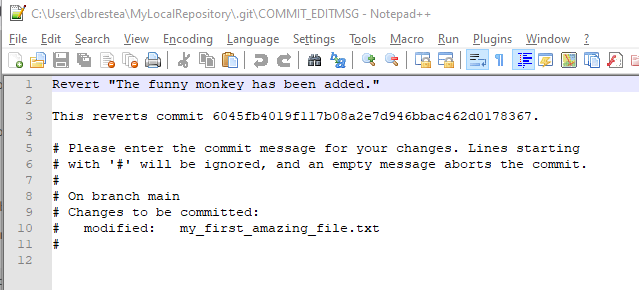
We use the revert command and the commit number that we want to cancel. The commit number is found by using the log –oneline command. In our case it is 6045fb4.

This command will open Notepad++ (because we configured this editor in the installation section), just close it or modify the first text line if you want another commit message.
Let’s now see the history

We can see that the revert operation has been written in the history, just as a usual commit.
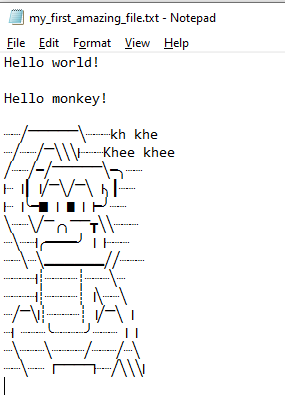
Let see how it looks like inside our amazing file (it may be needed to close/reopen the file).
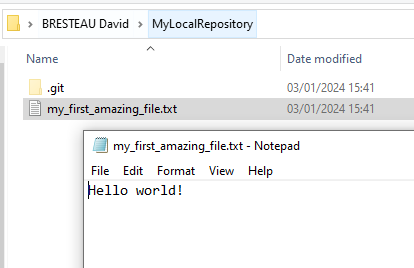
The monkey actually disappeared! :O
5.1.2.4.9. Work with branches
Within a given project, we can define several branches. Each branch will define different evolutions of the project. Git allows you to easily switch between those different branches, and to work in parallel on different versions of the same project. It is a central concept of a version control system.
Up to now, we worked on the default branch, which is by convention named main. This branch should be the most reliable, the most stable. A good practice is to never work directly on the main branch. We actually did not follow this rule up to now for simplicity. In order to keep the main branch stable, each time we want to modify our project, we should create a new branch to isolate our future changes, that may lead to break the consistency of the code.
Here is a representation of what is the current status of our project.

Fig. 5.2 We are on the main branch and we did 3 commits. The most recent commit of the branch is also called HEAD.
We will create a new branch, that we will call develop, with the following command
$ git branch develop
Then, we will switch to this branch, which means that from now on we will work on the develop branch.
$ git switch develop
It should look like this:
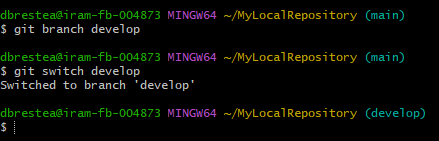
Notice that the name of the branch we are working on in displayed by Git Bash under brackets in light blue.
Within this branch, we will be very safe to try any modification of the code we like, because it will be completely isolated from the main one.
Let say that we now modify our file by adding some new animals (a bird and a mosquito), and commiting at each time. Here is a representation of the new status of our project.

If we are happy with those two last commits, and we want to include them in the main branch, we will merge the develop branch into the main one, using the following procedure.
We first have to go back to the main branch. For that, we use
$ git switch main
Then, we tell Git to merge the develop branch into the current one, which is main
$ git merge develop
And we can now delete (with the -d option) the develop branch which is now useless.
$ git branch -d develop
We end up with a main branch that inherited from the last commits of the former develop one (RIP).

This procedure looks overkill at first sight on such a simple example, but we strongly recommend that you try to stick with it at the very beginning of your practice with Git. It will make you more familiar with the concept of branch and force you to code with a precise purpose in mind before doing any modification. Finally, the concept of branch will become much more powerful when dealing with the remote use of Git.
5.1.2.4.10. Local development workflow
To conclude, the local development workflow is as follow:
Start from a clean repository.
Create a new branch develop to isolate the development of my new feature from the stable version of the code in main. Never work directly on the main branch!
Do modifications in the files.
Test that the result is as expected.
Do a commit.
Repeat the 3 previous steps as much as necessary. Try to decompose as much as possible any modification into very small ones.
Once the new feature is fully operational and tested, merge the develop branch into the main one.
Doing a commit is like saving your progression in a video game. It is a checkpoint where you will always be able to come back to, whatever you do after.
Once you will be more familiar with Git, you will feel very safe to test any crazy modification of your code!
5.1.2.5. Remote use of Git: GitHub
GitHub is a free cloud service that allows anyone to have Git repositories on distant servers. Such services allow their users to easily share their source code. They are an essential actors for the open-source development. You can find on GitHub such projects as the Linux kernel, the software that runs Wikipedia… and last but not least: PyMoDAQ!
Other solutions exist such as GitLab.
5.1.2.5.1. Create an account
First, we will need to create a personal account on GitHub. Please refer to the following tutorial to do so:
5.1.2.5.2. Create a remote repository
Once our profile is created, we go to the top right of the screen and click on the icon representing our profile.
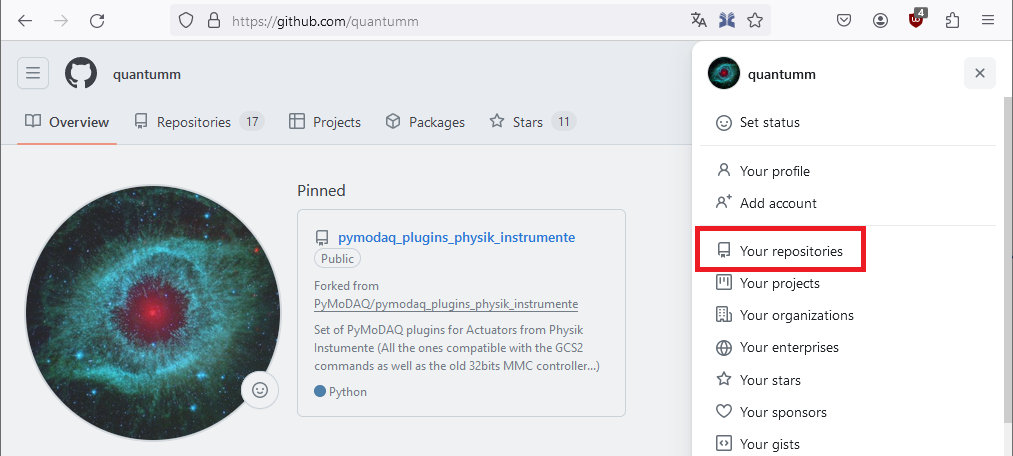
Let’s create a remote repository.

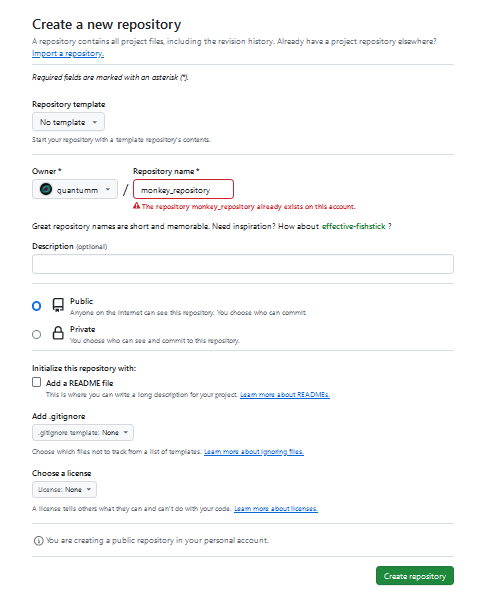
Let’s call it monkey_repository and click on Create repository.
Note
Note that we can create a public or a private repository. If we want the other users of GitHub to have access to the code that we will put in this repository, we will make it public. Otherwise we will make it private.
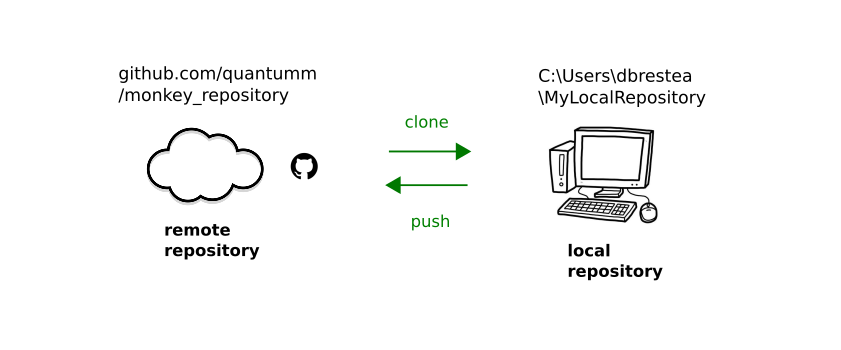
Let’s stop here for a bit of vocabulary:
Our local repository is the local folder that we created and configured to be followed by Git. Here it is our MyLocalRepository folder, that is stored on our local machine.
We call remote repository the one that we just created. Its name is monkey_repository and its Git address is https://github.com/Fakegithubaccountt/monkey_repository.git.
When we will talk about pushing, we will mean that we upload the state of our local repository to the remote repository.
When we will talk about cloning, we will mean that we downloaded the state of the remote repository to a local repository.
All this is summed up in the following schematic.
5.1.2.5.3. Authentication to GitHub with an SSH key
To get authorized by GitHub to interact with our remote repository, we will need to authenticate to it. Hopefully, it will not let anyone push what he wants on this repository! We have to prove him that we own the repository. The authentication is a bit more complicated than using a password, we will use the SSH protocol. No worries, everything is explained step by step in the following tutorial:
5.1.2.5.4. Push our local repository to GitHub
We started this tutorial from a local folder, and then created a remote repository on our GitHub account. For now the latter is empty. What we will do now is to push the content of our local repository to our remote repository.
Note
Note that it is not obvious that we will always work this way. Most of the time, we will start by cloning a remote repository to our local machine.
With the following command, we tell Git that our local repository (the folder where we are executing the command) from now on will be connected to the remote repository that we just created on GitHub. The latter is called origin by default. Be careful to be at the root of our local repository to execute the following command:
$ git remote add origin <the Git address of our remote repository>
Note
The Git address of a repository follows the naming convention https://github.com/GitHub_username/repository_name.git
With the next command, we will check that everything is as expected. We call for information about the remote repository.
$ git remote -v
It should look like this:
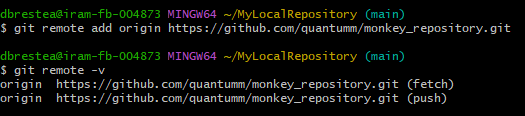
This is all good. The first line, ending with fetch, means that when we will ask to update our local repository (with a pull command, we will see that latter), it will call the origin repository. The second line, ending with push, means that when we will ask to update the remote repository with the work we have done locally, it will go to origin.
Let us try to push our repository!
$ git push -u origin main
Note
Notice that when we push, we push a specific branch, which is main here.
It should look like this:
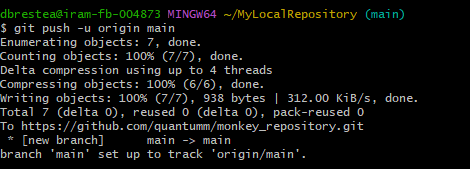
Our file is online!
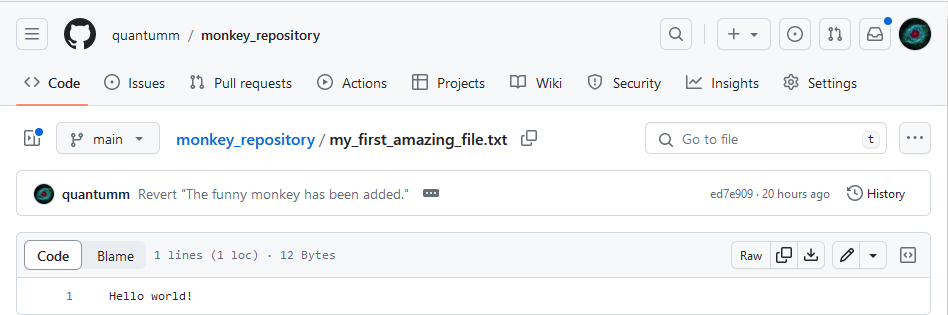
But it is not like we just store a file on a server, we also have access to all the history of the commits.
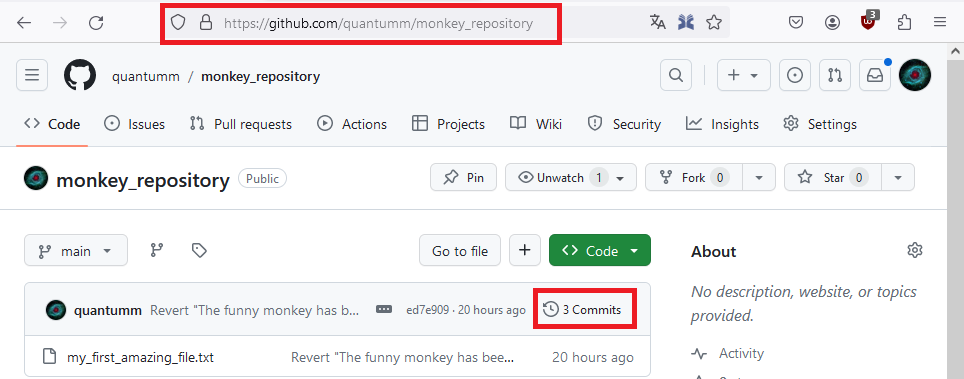
Here they are.

Let’s click on the second commit The funny monkey has been added.
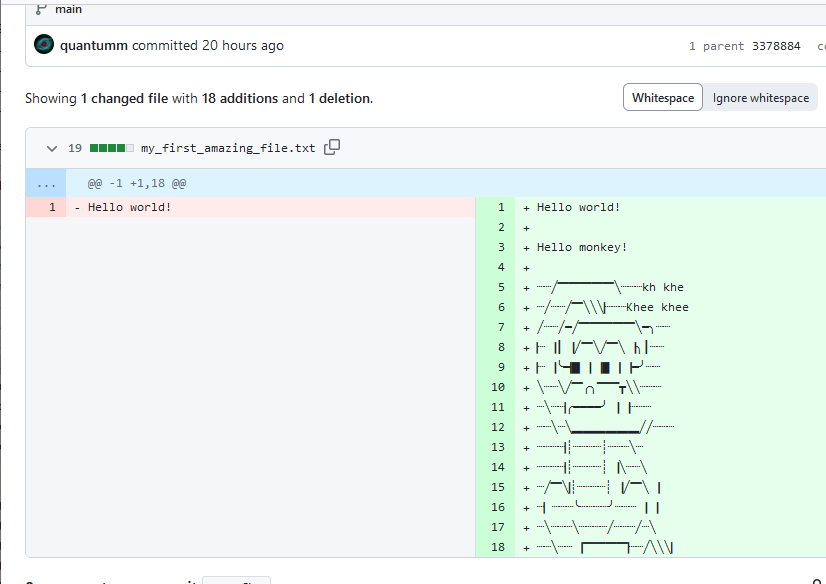
Here he is!
We see that the GitHub website provides an equivalent to what we see in the terminal. The advantage is that now we can access it from any computer connected to internet!
Finally, the development workflow is as follow:
Do modifications in the file on our local repository.
Test that the result is as expected.
Do a commit.
We can repeat the previous steps several times.
At the end of the day, we push all our commits to our remote repository.
Now, our remote repository should always be our reference, and not our local version anymore!
The lastest version of our code must be stored on the server, not locally. Once our push is done, we can safely delete our local folder. We will be able to get our code back at the latest version at any time from any computer, thanks to the clone command.
If you have further questions about the management of remote repositories, you can refer to this documentation:
5.1.2.5.5. The clone command
Ok so let’s do it, let’s delete our local folder MyLocalRepository. We will convince ourself that we can easily find it back.
Since our work is now stored on a GitHub server, it is not a problem even if our computer goes up in smoke. We can get it back with the clone command.
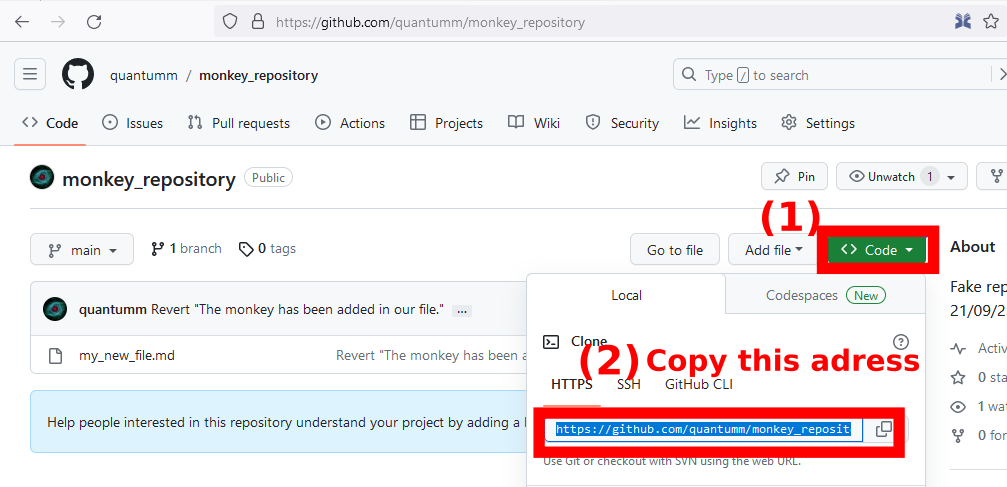
First, copy the Git adress of the repository
Then, at our home location, we execute the command
$ git clone <the Git address of our remote repository>
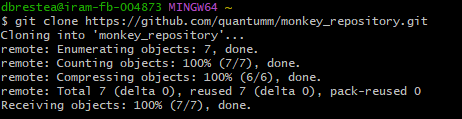
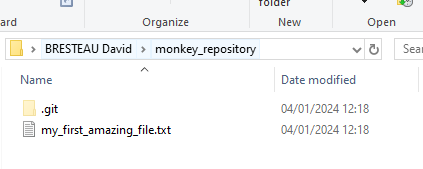
We found our work back!
Note
Notice that by default, the clone command will create a folder with the same name as the remote repository,
but this is not mandatory. If you want another name for your local repository you can use
$ git clone <repository url> <your folder name>.
Notice that when we clone a repository, we do not need anymore the init command. We do not need either to configure the address of the remote repository, Git already knows where to took it from.
We can follow this procedure for any public repository on GitHub, which allows us to download basically all the open-source codes in the world!
5.1.2.6. Git in practice: integration within PyCharm
We now master the basics of using Git with the command line (CLI), and it is like this that we get the best control of Git. But we should know that there are several graphical user interfaces (GUI) that can ease the use of Git in the daily life, such as GitHub Desktop if we are working with Windows.
However, we will rather recommand to use the direct integration within your favorite Python IDE, because it does not require to download another software, and because it is cross platform. We will present the practical use of Git with PyCharm. The Community Edition is free of charge and has all the functionalities that we need.
5.1.2.6.1. Link our GitHub account to PyCharm
As a first step, we should autorize PyCharm to connect to our GitHub account. We recommand to use a token. This way we will not have to enter a password each time PyCharm needs to connect to GitHub. The procedure is described in the following documentations:
PyCharm & GitHub (jetbrains.com)
PyCharm Integration with GitHub (medium.com)
Note
It seems like SSH connection is only for the Professional version of PyCharm, which is charged.
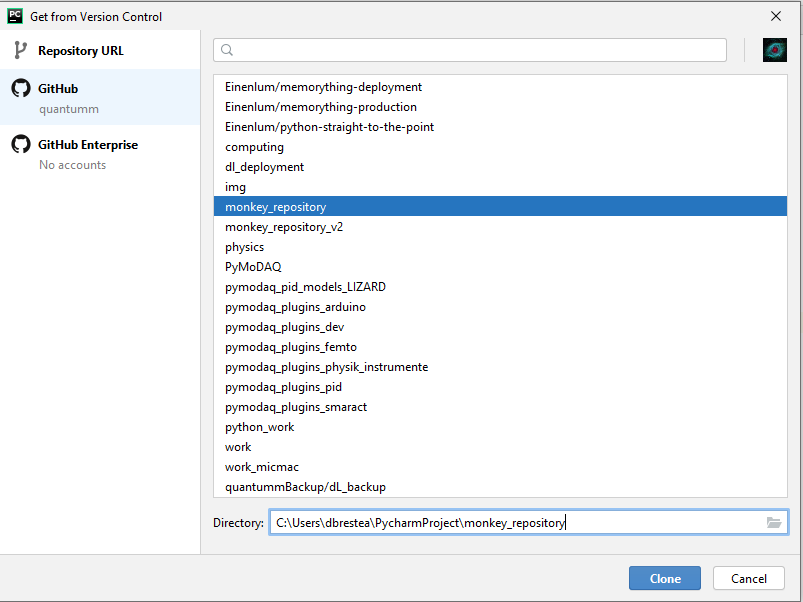
5.1.2.6.2. Clone a project
We first clone the monkey_repository from our GitHub account. Go to Git > Clone…, select the remote repository and a local folder where the files will be saved (it does not matter where we decide to save locally the repository).
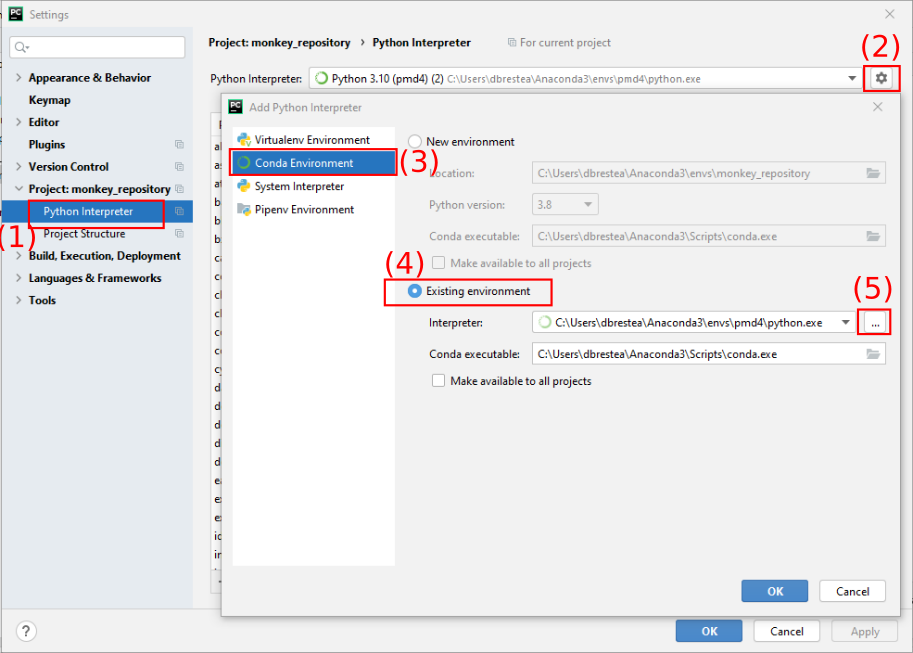
5.1.2.6.3. Configure our Python environment
Once the remote repository has been cloned, we have to configure our environment. Go to File > Settings… and select an existing Conda environment (here it is called pmd4).
Note
Documentation about setting up a new Python environment can be found here: PyMoDAQ installation.
5.1.2.6.4. Create a new branch
Here are the main important places on the PyCharm interface to manage Git.
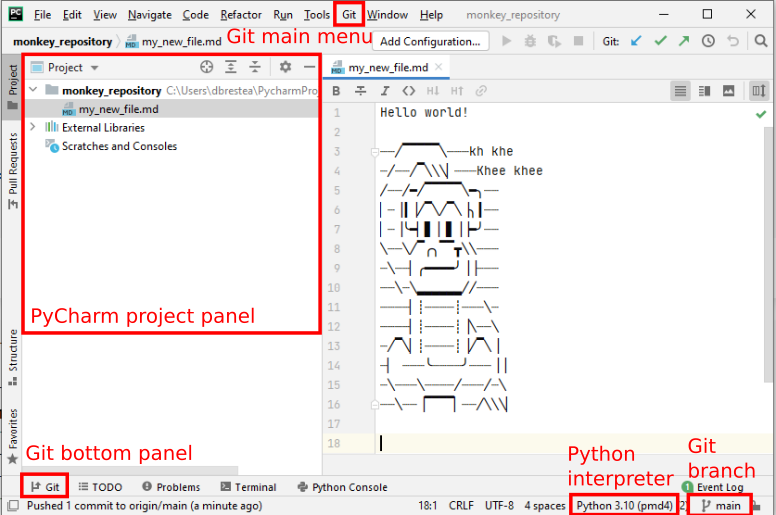
We will follow our best practices and create a new local branch before modifying the files in the repository. To do so we click on the Git branch button (see screenshot above) and create a new branch that we call develop.
5.1.2.6.5. Diff, commit and push
Let’s now add a bird in the file.
Then go to Git > Commit… It will open a window that allows us to easily see the files that have been modified. If we right click on my_new_file.md and select Show diff, we will see the difference between the two versions of the file, just as with the command line, but with a more evolved interface.
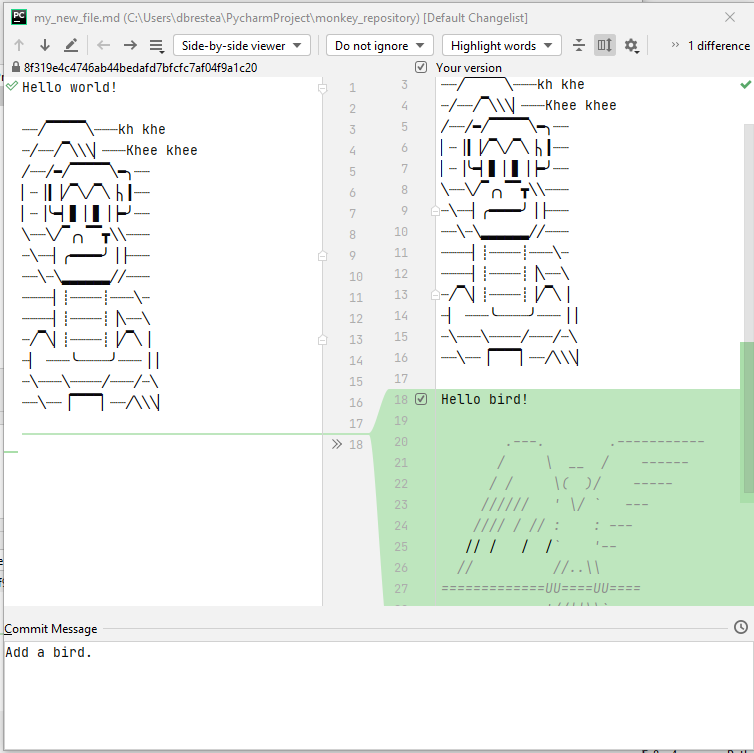
If we are happy with that, we can close this window and Commit & Push our changes with the corresponding button.
5.1.2.6.6. Add a file
Adding a file is also very easy since you just have to Paste it in the right folder within the Project panel of PyCharm: right click on the corresponding folder and select Paste or New file if you start from an empty one.
It will automatically ask us if we want Git to track the new file.
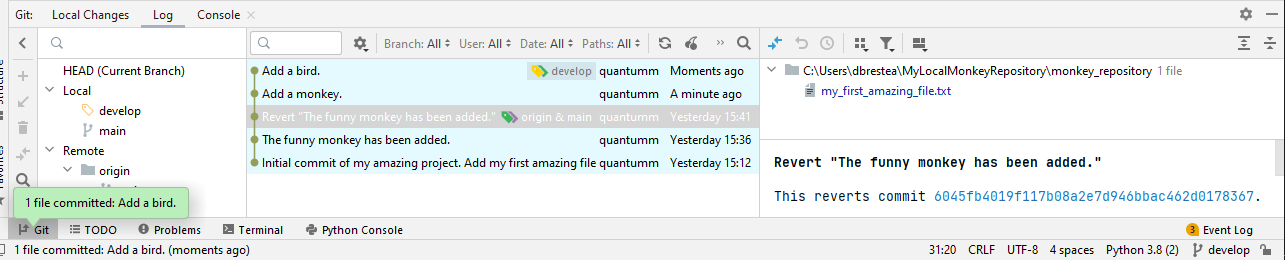
5.1.2.6.7. Log
If we open the Git bottom panel we can have information about the local and remote branches, and the history of the commits.
5.1.2.7. Conclusion
We now master the basics of the worldwide standard for code development! Following those guidelines, we will code more efficiently. Git is appropriate for any (descent) language (not Word or Labview!). It is an indispensable tool if we want to share our code with colleagues and not reinvent the wheel. Git is one of the reasons why we will make better acquisition programs with PyMoDAQ than with Labview ;)
If you want to go further and learn how to contribute to any external open-source code, we invite you to pursue with the tutorial
How to contribute to PyMoDAQ’s code?
Finally, here are a few external ressources:
The YouTube channel of Grafikart (in French)
The course of OpenClassroom (in English)
The Pro Git book (in English). Exhaustive and painful. You will probably not need it!
If you have any remarks regarding this tutorial, please do not hesitate to raise an issue or write an email to the author.